字节笔记本
2026年10月6日 · 约 33 分钟读完
AI 工作流专栏 04:全栈开发极速入门
导读:本文是 AI 工作流系列的基础篇,也是整个系列里最不像 AI 的一篇,但不建议跳过:AI 工作流工程师的前提是合格的全栈工程师。本篇用一篇文章打通前端加后端的最小知识闭环,目标是做出第一个全栈小项目。本篇内容较多,建议分两次读,边读边跟着敲代码。已有全栈经验的读者可以直接跳到本文第 7 节(FastAPI 后端)与第 8 节(前后端联调)。
本篇你将学到:
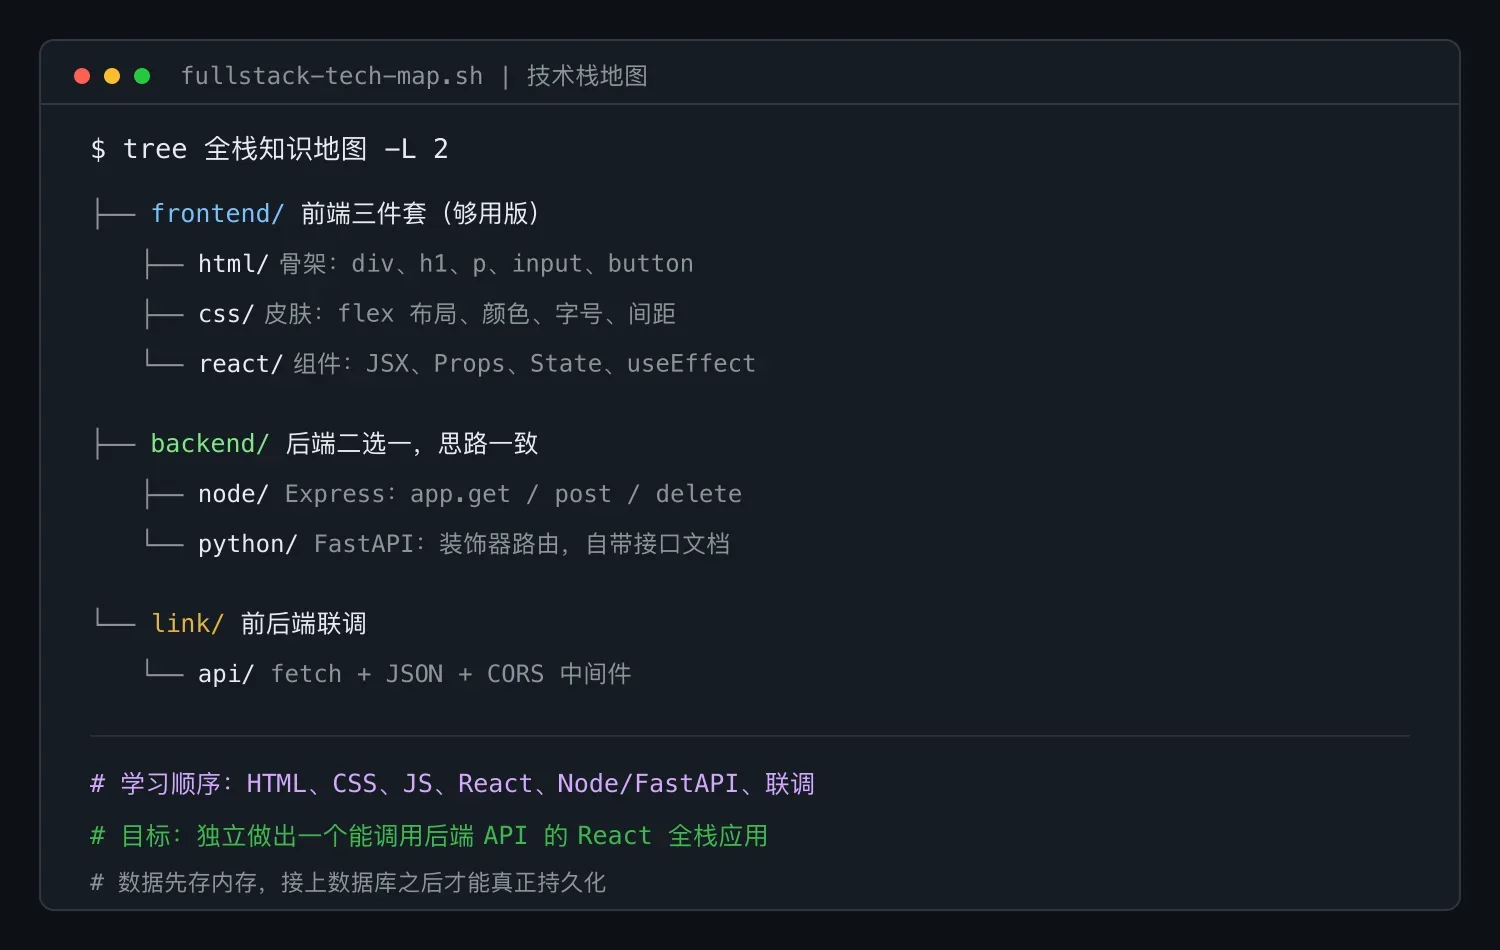
- 前端三件套(HTML/CSS/JS)的"够用版"语法
- React 的 5 个核心概念(看完能写页面)
- Node.js / FastAPI 后端最小知识
- 前后端如何通过 API 通信
- 把所有东西串起来做一个「AI 待办清单」全栈项目
一、先搞懂:什么是"全栈"?
全栈 = 前端 + 后端 + 数据库,一个人能独立做出一个完整 Web 应用。
- 前端:用户在浏览器里看到的部分(页面、按钮、动效)。技术:HTML + CSS + JavaScript + React
- 后端:跑在服务器上、处理业务逻辑的部分(接收请求、查数据库、返回数据)。技术:Node.js / Python(FastAPI) / Java / Go
- 数据库:存数据的地方。技术:PostgreSQL / MySQL / Redis
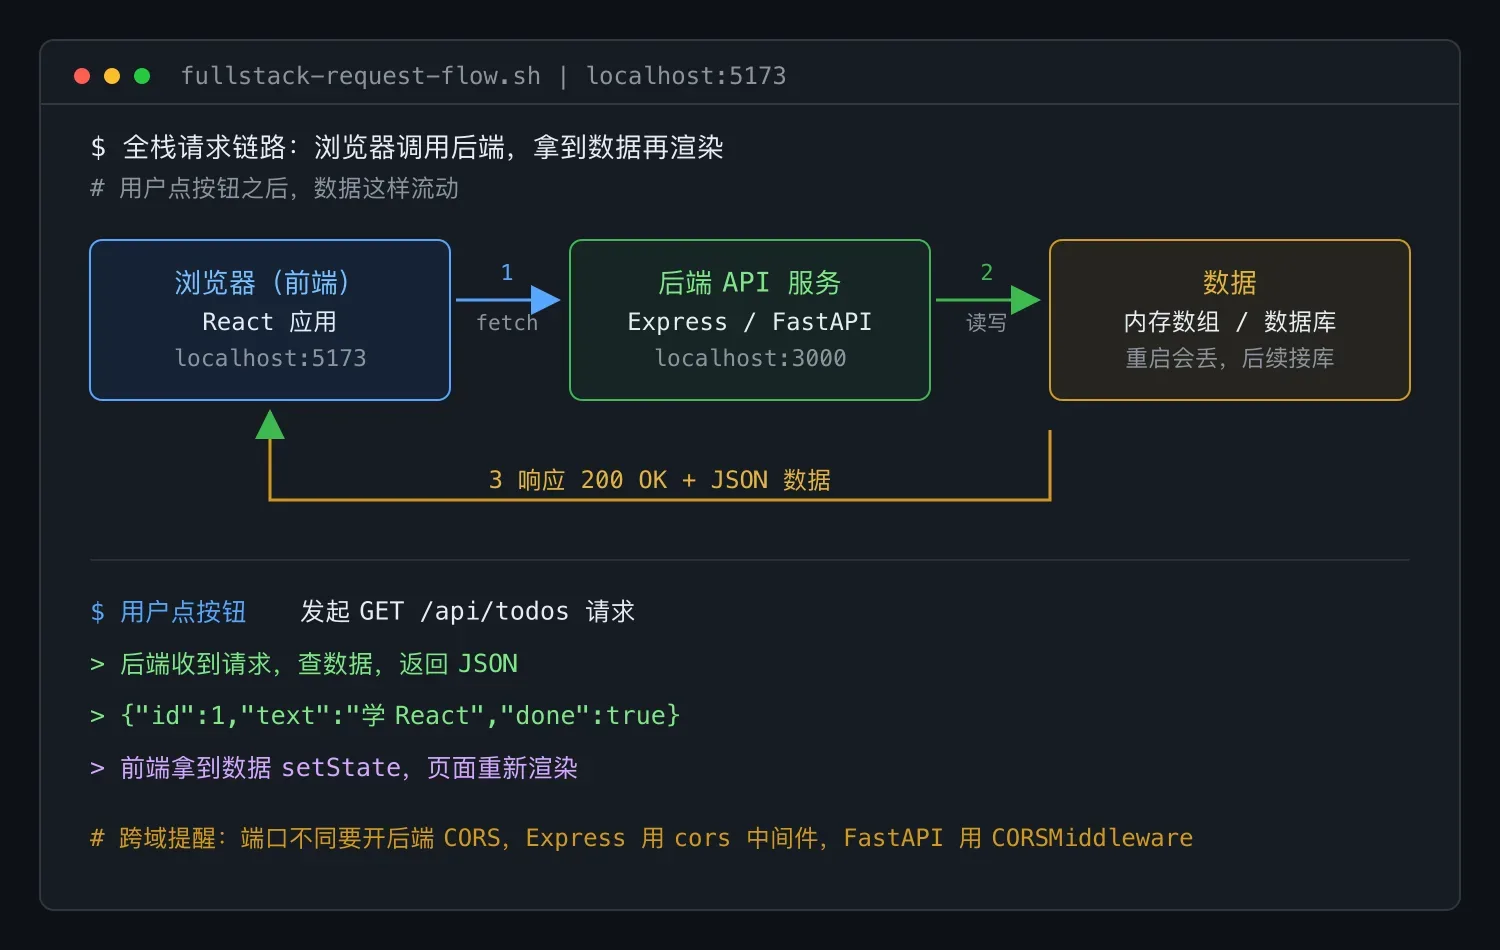
一个完整的请求流程:
用户点按钮
   → 浏览器发 HTTP 请求到后端
      → 后端处理(查数据库)
      → 数据库返回数据给后端
   → 后端把数据转成 JSON 返回浏览器
   → 浏览器(前端代码)把数据渲染成页面
用户看到结果
AI 工作流工程师之所以必须是全栈,是因为你的 AI 能力要嵌在这条链路里,比如"用户问问题 → 后端调大模型 → 返回答案 → 前端流式展示"。任何一环你都得能写。
二、HTML:页面的"骨架"
2.1 一个类比
HTML 决定页面有什么。比如"这里有个标题、那里有个输入框、底下有个按钮"。如果把页面比作一个人:HTML 是骨架,CSS 是皮肤和衣服,JS 是肌肉和神经,负责让页面动起来。
2.2 最小 HTML 模板
<!DOCTYPE html>
<html lang="zh-CN">
<head>
    <meta charset="UTF-8">
    <title>我的第一个页面</title>
</head>
<body>
    <h1>欢迎来到我的网站</h1>          <!-- 标题 -->
    <p>这是一段文字。</p>                <!-- 段落 -->
    <input type="text" placeholder="输入内容">  <!-- 输入框 -->
    <button>点击我</button>             <!-- 按钮 -->
    <ul>                                <!-- 无序列表 -->
        <li>第一项</li>
        <li>第二项</li>
    </ul>
</body>
</html>
把这段代码保存为 index.html,双击用浏览器打开,你就能看到一个网页。这就是前端最底层的运行方式。
2.3 AI 工程师必须会的 10 个标签
| 标签 | 用途 |
|---|---|
<div> | 容器(万能块) |
<span> | 行内容器 |
<h1>–<h6> | 标题 |
<p> | 段落 |
<input> | 输入框 |
<button> | 按钮 |
<ul> / <li> | 列表 |
<img> | 图片 |
<a> | 链接 |
<form> | 表单 |
就这 10 个,能搭出 80% 的页面。不用背,用多了自然记住。
三、CSS:页面的"皮肤"
CSS 决定页面长什么样(颜色、大小、位置、动画)。
3.1 三种写法(推荐第三种)
<!-- 写法 1:行内(不推荐,太乱) -->
<p style="color: red;">红色文字</p>

<!-- 写法 2:内联 -->
<style>
p { color: red; }
</style>

<!-- 写法 3:外部文件(推荐) -->
<link rel="stylesheet" href="style.css">
3.2 最常用的 CSS 属性
/* 选中和设置样式 */
.title {
    color: #333;              /* 文字颜色 */
    font-size: 24px;          /* 字号 */
    font-weight: bold;        /* 加粗 */
    margin: 16px 0;           /* 外边距(上下 左右)*/
    padding: 12px 20px;       /* 内边距 */
    background: #f0f0f0;      /* 背景 */
    border-radius: 8px;       /* 圆角 */
    box-shadow: 0 2px 8px rgba(0,0,0,0.1);  /* 阴影 */
}

/* 布局:弹性盒子(最常用) */
.container {
    display: flex;            /* 开启 flex 布局 */
    justify-content: center;  /* 水平居中 */
    align-items: center;      /* 垂直居中 */
    gap: 16px;                /* 子元素间距 */
}
Flex 布局是现代前端的基石,90% 的布局靠它。记住 display: flex + justify-content + align-items 这三件套,大部分布局都能搞定。
3.3 实用建议:直接用 Tailwind CSS
老实说,2025 年写裸 CSS 的人不多了。推荐你学 Tailwind CSS,用预设的"功能类"直接写样式:
<!-- 等价于上面的 .title,但不用写 CSS 文件 -->
<h1 class="text-2xl font-bold text-gray-800 my-4 px-5 py-3 bg-gray-100 rounded-lg shadow">
    标题
</h1>
建议日常项目直接用 Tailwind 起步,因为它能让你专注业务不纠结样式。
四、JavaScript:页面的"肌肉"
JS 决定页面怎么动:按钮点击做什么、数据怎么变、动画怎么跑。它是前端的核心,也是你必须花最多时间学的部分。
4.1 JS 基础语法(30 分钟看完版)
// 变量
let count = 0;          // 可变
const name = "Tom";     // 不可变
var old = 18;           // 老语法,别用了

// 数据类型
const str = "字符串";
const num = 42;
const bool = true;
const arr = [1, 2, 3];                    // 数组
const obj = { name: "Tom", age: 18 };     // 对象
const nul = null;
let undef;                                // undefined

// 函数(两种写法)
function add(a, b) { return a + b; }
const add2 = (a, b) => a + b;            // 箭头函数(推荐)

// 条件
if (age >= 18) { console.log("成年"); }
else { console.log("未成年"); }

// 循环
const arr2 = [1, 2, 3];
arr2.forEach(item => console.log(item));  // 遍历
const doubled = arr2.map(x => x * 2);     // 映射成新数组 [2,4,6]
const sum = arr2.reduce((a, b) => a + b, 0); // 求和 6

// 异步(重点!)
async function getData() {
    const res = await fetch("/api/data");   // 等待请求
    const data = await res.json();          // 解析 JSON
    console.log(data);
}
4.2 三个必会的数组方法
.map() / .filter() / .reduce() 是前端用得最多的三个方法,务必练熟:
const todos = [
    { id: 1, text: "学 HTML", done: true },
    { id: 2, text: "学 CSS", done: true },
    { id: 3, text: "学 JS", done: false },
];

// filter:过滤出未完成的
const undone = todos.filter(t => !t.done);
// → [{ id: 3, text: "学 JS", done: false }]

// map:转换成文本数组
const texts = todos.map(t => t.text);
// → ["学 HTML", "学 CSS", "学 JS"]

// reduce:统计完成了几个
const doneCount = todos.reduce((acc, t) => acc + (t.done ? 1 : 0), 0);
// → 2
4.3 DOM 操作(理解原理,实际用 React 后很少手写)
// 选中元素
const btn = document.querySelector("#myBtn");

// 监听点击
btn.addEventListener("click", () => {
    alert("被点了!");
});

// 修改内容
document.querySelector("#title").textContent = "新标题";
现代前端用 React 之后,你几乎不用手写 DOM 操作,React 帮你做了。但理解原理有助于你理解 React 在干嘛。
五、React:现代前端的"乐高"
React 让你把页面拆成一个个可复用的组件,像搭乐高一样拼出整个应用。
5.1 React 的 5 个核心概念
① 组件(Component):一个返回页面的函数
// 一个最简单的组件
function Welcome() {
    return <h1>你好,世界!</h1>;
}

// 使用
<Welcome />
② JSX:在 JS 里写 HTML 的语法
const name = "Tom";
const element = <h1>你好,{name}</h1>;   // {} 里可以写任何 JS 表达式
③ Props:父组件传给子组件的数据
function Greeting({ name }) {           // 接收 props
    return <h1>你好,{name}</h1>;
}

// 父组件传值
<Greeting name="Tom" />
<Greeting name="Jerry" />
④ State:组件内部的可变状态(核心!)
import { useState } from "react";

function Counter() {
    const [count, setCount] = useState(0);   // 声明状态,初始值 0

    return (
        <div>
            <p>当前计数:{count}</p>
            <button onClick={() => setCount(count + 1)}>+1</button>
        </div>
    );
}
useState 是 React 最重要的 Hook。改 state 用 setXxx,不要直接改。
⑤ useEffect:处理副作用(请求数据、订阅、定时器)
import { useState, useEffect } from "react";

function UserProfile({ userId }) {
    const [user, setUser] = useState(null);

    useEffect(() => {
        // 组件挂载时 / userId 变化时执行
        fetch(`/api/users/${userId}`)
            .then(res => res.json())
            .then(data => setUser(data));
    }, [userId]);   // 依赖数组:userId 变了才重新执行

    if (!user) return <p>加载中...</p>;
    return <h1>{user.name}</h1>;
}
就这 5 个概念,能写出 80% 的 React 应用。
5.2 用 React 写一个待办清单
import { useState } from "react";

export default function TodoApp() {
    const [todos, setTodos] = useState([
        { id: 1, text: "学 React", done: true },
        { id: 2, text: "学 Node.js", done: false },
    ]);
    const [input, setInput] = useState("");

    const addTodo = () => {
        if (!input.trim()) return;
        setTodos([...todos, { id: Date.now(), text: input, done: false }]);
        setInput("");
    };

    const toggle = (id) => {
        setTodos(todos.map(t => t.id === id ? { ...t, done: !t.done } : t));
    };

    return (
        <div style={{ maxWidth: 400, margin: "40px auto" }}>
            <h2>我的待办</h2>
            <div style={{ display: "flex", gap: 8 }}>
                <input
                    value={input}
                    onChange={e => setInput(e.target.value)}
                    onKeyDown={e => e.key === "Enter" && addTodo()}
                    placeholder="输入任务"
                />
                <button onClick={addTodo}>添加</button>
            </div>
            <ul>
                {todos.map(t => (
                    <li
                        key={t.id}
                        onClick={() => toggle(t.id)}
                        style={{ textDecoration: t.done ? "line-through" : "none", cursor: "pointer" }}
                    >
                        {t.text}
                    </li>
                ))}
            </ul>
        </div>
    );
}
把这段代码理解了,你就掌握 React 80% 的日常用法。
六、用 Vite 创建一个真实 React 项目
手写组件是基础,实际开发用脚手架。Vite 是目前最快的 React 脚手架。
# 创建项目
npm create vite@latest my-ai-app -- --template react

# 进入目录并安装依赖
cd my-ai-app
npm install

# 启动开发服务器
npm run dev
打开浏览器访问 http://localhost:5173,你就看到一个 React 应用在跑。改 src/App.jsx 文件,页面会自动刷新。
项目结构:
my-ai-app/
├── src/
│   ├── App.jsx          ← 主组件(你主要改这里)
│   ├── main.jsx         ← 入口
│   └── App.css          ← 样式
├── index.html
├── package.json
└── vite.config.js
七、Node.js / FastAPI:写后端 API
前端会了,现在学后端。后端的核心是"接收 HTTP 请求,返回数据"。
本文同时给出 Node.js (Express) 和 Python (FastAPI) 两个版本:前端生态与 Node.js 天然契合,AI 生态则几乎都在 Python,两边都值得掌握。
7.1 Node.js 版(Express 框架)
# 初始化
mkdir server && cd server
npm init -y
npm install express cors// server.js
const express = require("express");
const cors = require("cors");
const app = express();
app.use(cors()); // 允许跨域
app.use(express.json()); // 解析 JSON body
// 模拟数据库
let todos = [
{ id: 1, text: "学 React", done: true },
];
// GET 接口:获取所有待办
app.get("/api/todos", (req, res) => {
res.json(todos);
});
// POST 接口:新增待办
app.post("/api/todos", (req, res) => {
const newTodo = { id: Date.now(), text: req.body.text, done: false };
todos.push(newTodo);
res.status(201).json(newTodo);
});
// DELETE 接口:删除待办
app.delete("/api/todos/:id", (req, res) => {
todos = todos.filter(t => t.id !== parseInt(req.params.id));
res.json({ success: true });
});
app.listen(3000, () => console.log("服务跑在 http://localhost:3000"));启动:node server.js。用浏览器访问 http://localhost:3000/api/todos 就能看到 JSON 数据。
7.2 Python 版(FastAPI 框架):AI 工程师更推荐
pip install fastapi uvicorn# main.py
from fastapi import FastAPI
from fastapi.middleware.cors import CORSMiddleware
from pydantic import BaseModel
app = FastAPI()
# 允许跨域(前端在不同端口)
app.add_middleware(
CORSMiddleware,
allow_origins=["*"],
allow_methods=["*"],
allow_headers=["*"],
)
# 数据模型
class Todo(BaseModel):
text: str
# 模拟数据库
todos = [
{"id": 1, "text": "学 React", "done": True},
]
@app.get("/api/todos")
def get_todos():
return todos
@app.post("/api/todos")
def add_todo(todo: Todo):
import time
new = {"id": int(time.time() * 1000), "text": todo.text, "done": False}
todos.append(new)
return new
@app.delete("/api/todos/{todo_id}")
def delete_todo(todo_id: int):
global todos
todos = [t for t in todos if t["id"] != todo_id]
return {"success": True}启动:uvicorn main:app --reload --port 3000。访问 http://localhost:3000/docs 还能自动生成 API 文档(FastAPI 的杀手锏)。
为什么 AI 工程师推荐 Python? 因为 AI 生态(LangChain、LlamaIndex、transformers)几乎全是 Python。你后端用 FastAPI,后面接 AI 能力是无缝的。想做 AI 工作流,FastAPI 是优先级最高的后端选择。
八、前后端联调:把它俩接起来
现在前端跑在 5173,后端跑在 3000,怎么让前端调到后端?
8.1 修改 React 组件,调用后端 API
import { useState, useEffect } from "react";

export default function TodoApp() {
    const [todos, setTodos] = useState([]);
    const [input, setInput] = useState("");

    // 挂载时从后端拿数据
    useEffect(() => {
        fetch("http://localhost:3000/api/todos")
            .then(res => res.json())
            .then(data => setTodos(data));
    }, []);

    const addTodo = async () => {
        if (!input.trim()) return;
        const res = await fetch("http://localhost:3000/api/todos", {
            method: "POST",
            headers: { "Content-Type": "application/json" },
            body: JSON.stringify({ text: input }),
        });
        const newTodo = await res.json();
        setTodos([...todos, newTodo]);
        setInput("");
    };

    return (
        <div style={{ maxWidth: 400, margin: "40px auto", fontFamily: "sans-serif" }}>
            <h2>我的待办(连后端版)</h2>
            <div style={{ display: "flex", gap: 8 }}>
                <input
                    value={input}
                    onChange={e => setInput(e.target.value)}
                    onKeyDown={e => e.key === "Enter" && addTodo()}
                    placeholder="输入任务回车添加"
                    style={{ flex: 1, padding: 8 }}
                />
                <button onClick={addTodo}>添加</button>
            </div>
            <ul style={{ paddingLeft: 20 }}>
                {todos.map(t => (
                    <li key={t.id} style={{ margin: "8px 0" }}>{t.text}</li>
                ))}
            </ul>
        </div>
    );
}刷新前端页面,添加一个待办,它已经存到后端了。注意:数据目前存在后端的内存里,后端一重启就会丢,接上数据库之后才能真正持久化。
8.2 跨域问题(CORS)
如果你看到浏览器报 CORS error,是因为前端(5173)和后端(3000)端口不同,浏览器默认拦截。解法是后端加 cors 中间件(上面代码已加)。
九、小结
回顾本篇要点:
- 全栈 = 前端 + 后端 + 数据库,AI 能力嵌在这条链路里。
- 前端三件套:HTML(骨架)/ CSS(皮肤)/ JS(肌肉)。推荐用 Tailwind 替代手写 CSS。
- React 5 个核心:组件 / JSX / Props / State (useState) / 副作用 (useEffect)。会这 5 个就能写 80% 的页面。
- 后端最小知识:Express(Node)或 FastAPI(Python)写 GET/POST/DELETE 接口。AI 工程师推荐 FastAPI,因为 AI 生态全在 Python。
- 前后端通过 fetch + JSON 通信,注意 CORS 跨域问题。
到这里,你已经能做出"一个会调后端 API 的 React 应用"。给它接上数据库,它才能真正把数据存下来。
十、动手练习
练习 1(基础):跟本篇走一遍,做出「连后端版的待办清单」。把代码推到 GitHub。
练习 2(进阶):给待办清单加功能:
- 点击待办项可标记为"已完成"(划线)
- 每条待办右侧加"删除"按钮
- 顶部显示"共 X 项,已完成 Y 项"
练习 3(挑战):用 Tailwind CSS 把这个待办清单美化一遍,做成卡片风格 + 渐变背景。提示:npm install -D tailwindcss postcss autoprefixer && npx tailwindcss init。
十一、延伸阅读
- MDN Web Docs(前端最权威文档):https://developer.mozilla.org
- React 中文文档(建议重点重读 useEffect 章节):https://zh-hans.react.dev
- FastAPI 官方教程:https://fastapi.tiangolo.com/zh/tutorial/
- Tailwind CSS 文档:https://tailwindcss.com/docs
- Vite 官方指南:https://cn.vitejs.dev
- 书:《JavaScript 高级程序设计》(红宝书),想深入 JS 必读